


Growing Microgreens Method & Instructions.
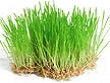
Welcome to the world of growing your own microgreens!. You can grow outdoors in warm seasons, or indoors all year long… even if you have limited space. It’s literally counter top gardening. Microgreens are inexpensive, fun to grow and cover a wide variety of exciting, nutrition dense tastes. We hope you enjoy growing and eating these exciting living foods!
Materials
The materials you’ll need are included in this kit
- Growing trays without drain holes
- Soil mix
- Seeds
- Spray bottle
- The following instructions
Step-by-Step Instructions
Specific details and additional instructions per seed type are found on each individual product page. Simply use the search bar above to find the product page of your specific seed.
What follows are general instructions for growing your microgreens or baby salad greens. Based on times to germination and harvest, you may need to sow your seeds at different times if you want to harvest all your greens at the same time. The micro greens growing kit includes enough seed for several plantings. You may find that while micro greens are generally easy to grow, you may need to experiment a bit to get it just right.
- Step 1: Pre-Soak Seeds – Most seeds that require soil as a growing medium require a pre-soak before being spread over your soil. To soak, submerge the seeds in a jar filled with cold water. Make sure there is plenty of water, as some seeds (like peas) absorb surprising amounts of water. Keep in a cool place, even in your refrigerator on hot days. When pre-soaked for an appropriate time (see specific seed product page), rinse thoroughly with cold water. Optionally, you can transfer the seeds (except beet, which should be planted directly) to a colander and rinse every 12 hours for another day before planting.
- Step 2: Prepare Your Trays – For micro greens you will want about 1.5-2 inches of soil in the tray. Put 4 cups (for a 10" x 20" tray) of water in the tray, then transfer the soil to the tray, spread the soil evenly and gently tamp it flat, (the back of a spatula is perfect for this). You want a flat, even bed of soil that is firm, but not compacted. Dampen the top soil by sprinkling a little water gently and evenly over the soil. The soil should be quite damp but not soggy. Re-tamp gently if necessary.
- Step 3: Spread Your Seeds – Spread your soaked seed evenly across the tray. Larger seeds like buckwheat, sunflower and pea will end up being quite thickly spread.
- Step 4: Water & Cover - Gently tamp the seeds flat into the soil. The goal here isn’t to crush the seeds into the soil, but to simply make sure that the seeds are making firm contact with the soil. Use your spray bottle to thoroughly mist the seeds directly on the soil. Now take one of the other trays and use your spray mister to spray the inside of it 4 or 5 times with an even distribution of mist. Use that misted tray as a black-out and humidity dome on your recently seeded tray. Your newly sown seeds need humidity and darkness to thrive. Set your tray in a place where it won’t get too hot, or too cold. 65 to 75 degrees Fahrenheit is ideal.
- Step 5: Mist Every 12 Hours – Uncover the seed tray every 12 hours or so and mist them again with your spray bottle. 15 to 20 evenly distributed sprays should do. Do not add additional water other than the misting. Re-cover your tray.
- Step 6: Uncover The Tray – Your crop should be ready to uncover after 3-5 days (see specific product page). You can judge this by watching for when the baby leaves (cotyledons) of your crop first emerge, and then waiting one more day. It is important to keep your crop in the dark for the first 4 to 5 days to force your crop to grow in the struggle for light. This will help you grow a strong crop. Once you uncover the tray, make sure your crop gets plenty of light. We highly recommend LED grow lights . Direct sunlight, fluorescent, or incandescent lights are also good. If your crop angles for light, be sure to rotate the tray occasionally.
- Step 7: Check Daily – Your crop should have the right balance of water from now till harvest. Check the soil. It should be moist, but not soggy. If necessary, replenish water by sprinkling or pouring water over the soil, avoiding the leaves as much as possible. Do not use the spray bottle anymore.
- Step 8: Time to Harvest – Most microgreens will be ready to harvest in 10 days. Some crops can be harvested as early as 7 days. Most crops will not last pass 14 or 15 days before they must be harvested. Search for the product page of your specific seed to know when to harvest your specific seed.
- Step 9: Harvest – Move your trays to a cool, shady place. If your greens are harvested when it is too hot, they will wilt very quickly after harvesting. If harvested when cool (late evening, early morning), they will tend to stay fresh and crisp.
Harvesting Method: Use scissors to trim the microgreens just above the soil line. Think of it as giving your greens a haircut.
- Step 10: Rinse & Dry – Use a colander to rinse your microgreens thoroughly under cold water. Dry the greens completely by spreading over a towel or paper towels and air dry. Speed drying by using a fan on a slow setting. Cut greens are best if served right after drying, but can be stored loosely in a bowl in the refrigerator for several days. Do not try to refrigerate greens that are not completely dry.
Troubleshooting & Tips
Below are some general ideas and troubleshooting tips to help make your greens growing experience easier. Growing microgreens is fun and fairly easy, but expect to have some failures in the process as you experiment in getting it just right.
- Planting Too Thick – If you spread your seeds too thickly the micro greens will come in too dense and be susceptible to rot. If you feel like your greens in are coming in too thick, you can always thin out the crop by carefully plucking individual plants.
- Planting Too Thin – For micro greens this will make for a small, scraggly crop, but won’t cause any trouble.
- Over Watering – Microgreens will thrive if the roots get the right mix of water and oxygen. Over-watering causes the root to not get enough oxygen and makes the crop susceptible to root diseases, and can even result in the loss of a tray. Avoid any puddles that extend above the root line. Ideally water should lay in the channels of the bottom of the tray.
- Under Watering – Watch carefully for any signs of wilting. The grow pad should be kept fairly soggy for the full growth cycle. If the grow pad is merely damp, there is probably not enough water in the tray.
- Re-cutting – Once harvested, micro greens will not re-grow. Dispose of the spent grow pads.
- Rot – If you notice sections of rot in your tray it can be a sign of over-watering, or sowing seeds too thickly. However, most of the time rot is an indication that your water is too alkaline (pH higher than 6.5). Make sure you pH balance your water or you will have weak crops. If you do have occurrences of rot, give the rotting area a wide berth at harvest.
- Multiple Crop Trays – There is no problem in sowing multiple crops in the same tray, in fact it’s a great idea! You can easily segregate your seeds into different sections of the same tray. It is even okay to sow seeds with varying harvest times in the same tray.
- Temperature – Cold will slow down growth rates of your micro greens dramatically. A nice warm spot will speed things up.
- Generally Weak Crop – If you baby your crop too much, it can make the crop weak. Microgreens should struggle a bit to survive. If they are not kept in the dark long enough, the roots won’t establish themselves well, and will result in a weak looking tray. If you are having trouble with weak trays, you can add a little stress to strengthen your crop. Instead of uncovering your crop and exposing to light after 4 or 5 days, take the tray you are using as a dome and flip it. Spray the underside of the tray to moisten it, and lay it inside the growing tray so that the bottom of the tray rests on top of your seedlings. This will force your crop to establish a better root, and grow much stronger to lift the tray and reach for light. Leaving the tray on the crop in this manner from day 4 to day 6 can really strengthen a weak crop.
- Pale Crop – Consider using a stronger light source for your microgreens.
- Mucilaginous Seeds – Mucilaginous seeds should be sown and cared for the same as any other seed. A gel coating will likely form around the seed. Therefore, they don't need as much water. Because of this they are prone to mold if over-watered. It's highly recommended to use terra cotta as a growing medium.
- Presoaking – Some seed types will do better if pre-soaked. See the product page of your specific seed for details. Usually seeds that should be grown in soil will require a presoak. Presoak for the indicated time period in cold water.
5 Comment(s)
Tôi luôn cảm thấy an tâm khi chơi tại FB88, họ rất chú trọng bảo mật thông tin người chơi.
Tôi rất thích các trò chơi live casino của FB88, họ mang lại cảm giác như đang chơi trực tiếp tại casino.
Tôi rất thích trải nghiệm các trò chơi slot tại FB88, phần thưởng rất lớn và hấp dẫn.
FB88 cung cấp một nền tảng rất dễ sử dụng, tôi chưa bao giờ gặp vấn đề với giao diện.
Các chương trình khuyến mãi của họ rất dễ dàng tham gia và thường xuyên có phần thưởng hấp dẫn.
Hệ thống bảo mật của họ rất chặt chẽ, giúp tôi cảm thấy yên tâm khi chơi.
Microgreens are such a game-changer for anyone with limited space or time. I’ve been growing them on my kitchen counter and it’s surprisingly easy once you get the hang of it. The key is definitely the watering part – don’t overdo it, but don’t let it dry out either. If you notice any mold or rot spots, it’s usually from overwatering or packing the seeds too tight. Always keep the trays in a cool spot and out of direct sunlight until they’re ready. I also learned the hard way that they need to be harvested when cool, or they’ll wilt fast. Definitely a bit of trial and error but so worth it for fresh greens.
Reading this post was a lot of fun. It struck a rare balance between being educational and conversational. Continue the fantastic work.
Thanks on your marvelous posting! I certainly enjoyed reading it, you are a great author.I will always bookmark your blog and will often come back in the foreseeable future. I want to encourage continue your great job, have a nice evening!
Leave a Comment